Table of Contents
Status of files
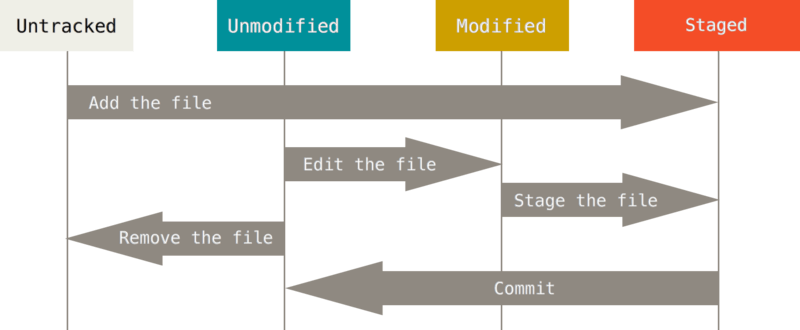
- Modified means that you have changed the file but have not committed it to your database yet.
- Staged means that you have marked a modified file in its current version to go into your next commit snapshot.
- Committed means that the data is safely stored in your local database.
- Untracked basically means that Git sees a file you didn’t have in the previous snapshot (commit), and which hasn’t yet been staged; Git won’t start including it in your commit snapshots until you explicitly tell it to do so. It does this so you don’t accidentally begin including generated binary files or other files that you did not mean to include.
Commands
git status
#check the status of all files
git status

#short status
git status -s
#output of short status
$ git status -s
 M README
MM Rakefile
A  lib/git.rb
M  lib/simplegit.rb
?? LICENSE.txt
New files that aren’t tracked have a ?? next to them, new files that have been added to the staging area have an A, modified files have an M and so on. There are two columns to the output — the left-hand column indicates the status of the staging area and the right-hand column indicates the status of the working tree. So for example in that output, the README file is modified in the working directory but not yet staged, while the lib/simplegit.rb file is modified and staged. The Rakefile was modified, staged and then modified again, so there are changes to it that are both staged and unstaged.
git add
git add is a multipurpose command — you use it to begin tracking new files, to stage files, and to do other things like marking merge-conflicted files as resolved. It may be helpful to think of it more as “add precisely this content to the next commit” rather than “add this file to the project”.
git add <filename>

#add all changes in one batch
git add --all
git diff
#To see what you’ve changed but not yet staged
git diff

#to see what you’ve staged that will go into your next commit
git diff --staged
#OR
git diff --cached
git commit
This command commit all the staged changes in batches. Anything that is still unstaged — any files you have created or modified that you haven’t run git add on since you edited them — won’t go into this commit.
git commit -m 'message'

#to skip staging
#this command automatically stage all tracked files
git commit -a -m 'message'
git rm
To remove a file from Git, you have to remove it from your tracked files (more accurately, remove it from your staging area) and then commit. The git rm command does that, and also removes the file from your working directory so you don’t see it as an untracked file the next time around.
If you simply remove the file from your working directory, it shows up under the “Changes not staged for commit” (that is, unstaged) area of your git status output.
If you modified the file or had already added it to the staging area, you must force the removal with the -f option. This is a safety feature to prevent accidental removal of data that hasn’t yet been recorded in a snapshot and that can’t be recovered from Git.
git rm <filename>

git rm log/\*.log
git rm \*~

git rm -f <filename>

#untrack a file instead of removing it
git rm --cached README
git mv
rename or move a file
git mv <filename> <new_filename>
Undoing Things
Be careful, because you can’t always undo some of these undos. This is one of the few areas in Git where you may lose some work if you do it wrong.
Remember, anything that is committed in Git can almost always be recovered. Even commits that were on branches that were deleted or commits that were overwritten with an --amend commit can be recovered (see Data Recovery for data recovery). However, anything you lose that was never committed is likely never to be seen again.
Commands
additional commit
When you commit too early and possibly forget to add some files, or you mess up your commit message. Make the additional changes you forgot, stage them, and commit again using the --amend option.
This command merge your last commit with what is changed after that as one. You end up with a single commit — the second commit replaces the results of the first. The previous won’t show up in the repository history.
Only amend commits that are still local and have not been pushed somewhere.
git commit --amend
unstage files
This command doesn’t unmodify changes in the file, but make the file unstaged for the following commit.
git reset HEAD <filename>
#OR (in lastest version)
git restore --staged <filename>
unmodifying a modified file
discard changes made to files
git checkout -- <filename>
#OR (in lastest version)
git restore <filename>
Working with Remotes
Remote repositories are versions of your project that are hosted on the Internet or network somewhere. You can have several of them, each of which generally is either read-only or read/write for you. Collaborating with others involves managing these remote repositories and pushing and pulling data to and from them when you need to share work. Managing remote repositories includes knowing how to add remote repositories, remove remotes that are no longer valid, manage various remote branches and define them as being tracked or not, and more.
Commands
show your remotes
git remote

#show the URLS
git remote -V
add remote repositories
git remote add <remote_name> [URL]
fetch and pull
git fetch <remote_repo>

#automatically fetch and merge
git pull <remote_repo>

#fetch all branches at once
git pull <remote_repo> --all
push to your remotes
#If local and remote have the same branch name
git push <remote_repo> BranchName

#else
git push <remote_repo> localBranchName:remoteBranchName
This command works only if you cloned from a server to which you have write access and if nobody has pushed in the meantime. If you and someone else clone at the same time and they push upstream and then you push upstream, your push will rightly be rejected. You’ll have to fetch their work first and incorporate it into yours before you’ll be allowed to push.
compare two repositories
git diff <branch_name> remotes/<remote_name>/branch_name
inspect a remote
git remote show <remote_repo>
rename and remove
git remote rename <old_name> <new_name>

git remote remove <remote_repo>
Branching
When you create a new branch, you create a new pointer to the same commit you’re currently on. The special pointer HEAD points to the branch you’re currently on.
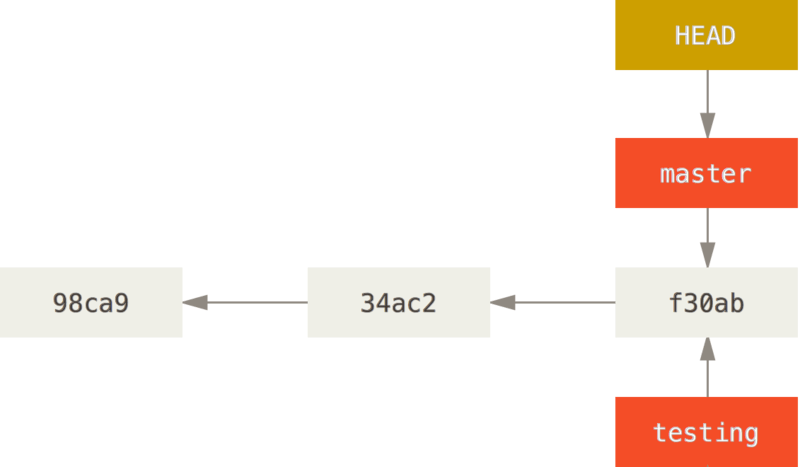
create a new pointer to the current commit
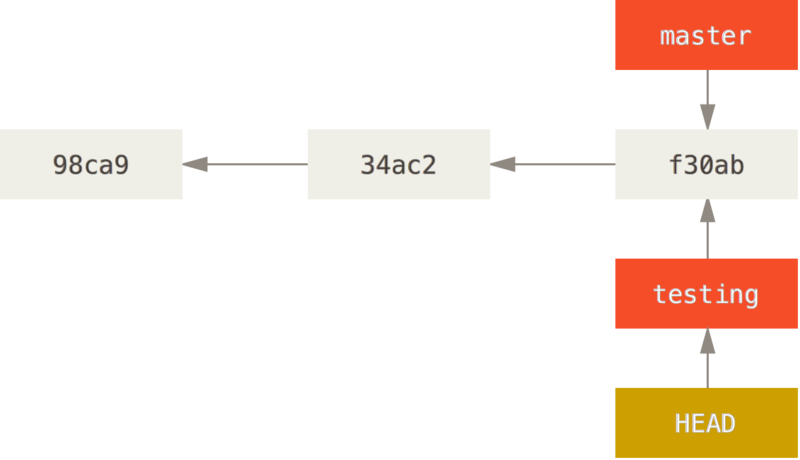
move the HEAD pointer to testing branch
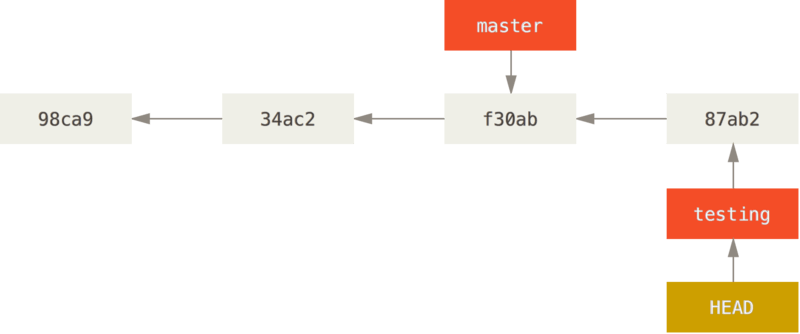
HEAD pointer moves forward when you do a commit
Because a branch in Git is actually a simple file that contains the 40 character SHA-1 checksum of the commit it points to, branches are cheap to create and destroy. Creating a new branch is as quick and simple as writing 41 bytes to a file (40 characters and a newline).
Commands
check branches
#check local branches
git branch

#check local and remote branches
git branch -a
By default, git clone only pull the default branch down (e.g. master). branch -a command show all the hidden branch. Use pull -all command to pull down all the branches, or create a local tracking branch.
* master
  remotes/origin/HEAD -> origin/master
  remotes/origin/ROC_modified
  remotes/origin/master
#take a quick peek at an upstream branch, check it out directly
git checkout orgian/<branch_name>

#create a local tracking branch
git checkout <branch_name>

create a branch
git branch <branch_name>
check the pointer
git log doesn’t show all the branches all the time. By default, git log will only show commit history below the branch you’ve checked out.
git log --oneline --decorate
switch branches
It moved the HEAD pointer point to specific branch, and it reverted the files in your working directory back to the snapshot that branch points to.
git checkout <branch_name>
#OR
git switch <branch_name>
remove branches
git branch --delete <branch_name>
merge branches
#switch to the branch that is backward
git checkout branchA

#branchA <- branchB
git merge branchB